PXE & HTTP(s) Booting DHCP Options
Introduction
In this post I’ll be going over the DHCP Options required for PXE & HTTP(s) Booting, this is a follow-up post to my previous post on iPXE & HTTP(s) Secure Booting.
DHCP Options Required
Option 66 (TFTP Boot Server) and Option 67 (Boot File Name) are required for PXE Booting
Option 60 (Vendor Identifier) of “HTTPClient” and Option 67 (Boot File Name) are required for UEFI HTTP(s) Booting.
As Network Booting is different between BIOS and UEFI or HTTP(s) we need to look at the Vendor Class Identifier to determine which options to send, so lets look at how we can achieve this on both Windows Server DHCP and DNSMasq.
Windows Server DHCP
Windows DHCP Server has the ability to create Vendor Classes, this allows you to create a class based on the Vendor Class Identifier and assign options to that class. Another good blog post on this by Mike Galvin at: PXE Booting with WDS for UEFI and BIOS Devices
Vendor Classes
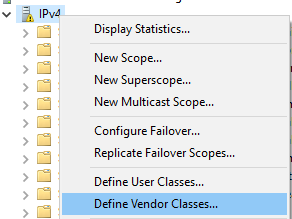
Making the Classes, this can be done by right-clicking on the IPv4 node in the DHCP Server and selecting “Define Vendor Classes” then adding the following classes:
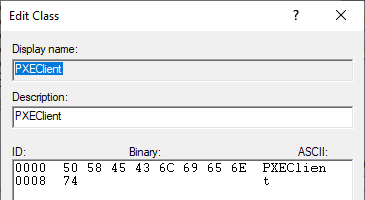
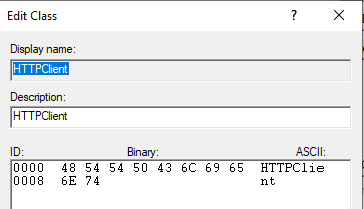
Name and Description can be anything you like, the Data is the Vendor Class Identifier.
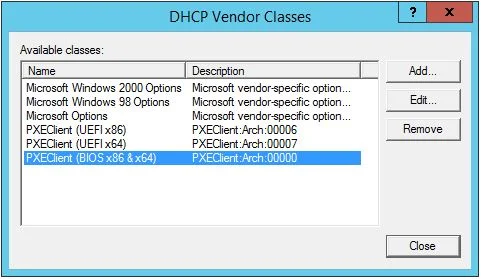
- PXEClient (UEFI x64) = PXEClient:Arch:00007
- PXEClient (UEFI x86) = PXEClient:Arch:00006
- PXEClient (BIOS x86 & x64) = PXEClient:Arch:00000
1
2
3
Add-DhcpServerv4Class -Name "PXEClient (UEFI x64)" -Type Vendor -Data "PXEClient:Arch:00007"
Add-DhcpServerv4Class -Name "PXEClient (UEFI x86)" -Type Vendor -Data "PXEClient:Arch:00006"
Add-DhcpServerv4Class -Name "PXEClient (BIOS x86 & x64)" -Type Vendor -Data "PXEClient:Arch:00000"
Or we can just use the following with a wildcard suffix for UEFI Only:
- PXEClient = PXEClient
- HTTPClient = HTTPClient
1
2
Add-DhcpServerv4Class -Name "PXEClient" -Type Vendor -Data "PXEClient"
Add-DhcpServerv4Class -Name "HTTPClient" -Type Vendor -Data "HTTPClient"
You can use wire shark to determine the Vendor Class Identifier, but the above should cover most cases.
Following either option you should now have some Vendor Classes Defined:
Policies & Options
Then we need to create policies for each Vendor Class, this can be done by right-clicking on the Scope > Policy node in the DHCP Server and selecting “New Policy” Configure the conditions to the required Vendor Class with a wildcard suffix if required. Add in the configured settings for the policy, DHCP Option 60, 66 & 67 as required.
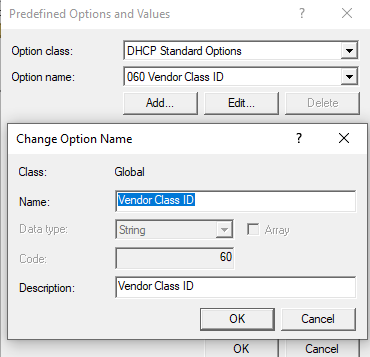
For HTTP(s) booting you may need to add in Option 60 in Predefined Options if it’s not already there, selecting “Predefined Options and Values” then adding Option 60 with the Data Type of String:
Via Powershell replacing [10.10.10.0] with your Scope ID, [Boot-Server-IP] with your TFTP/HTTP Server and the boot file with the correct file for your environment:
For only UEFI:
1
2
3
4
5
6
7
Add-DhcpServerv4Policy -Name "PXEClient" -ScopeId 10.10.10.0 -Condition OR -VendorClass EQ,"PXEClient*"
Add-DhcpServerv4Policy -Name "HTTPClient" -ScopeId 10.10.10.0 -Condition OR -VendorClass EQ,"HTTPClient*"

Set-DhcpServerv4OptionValue -ScopeId 10.10.10.0 -PolicyName "PXEClient" -OptionId 066 -Value [Boot-Server-IP]
Set-DhcpServerv4OptionValue -ScopeId 10.10.10.0 -PolicyName "PXEClient" -OptionId 067 -Value "ipxe.efi"
Set-DhcpServerv4OptionValue -ScopeId 10.10.10.0 -PolicyName "HTTPClient" -OptionId 060 -Value "HTTPClient"
Set-DhcpServerv4OptionValue -ScopeId 10.10.10.0 -PolicyName "HTTPClient" -OptionId 067 -Value "http://[Boot-Server-IP]:4433/ipxe.efi"
For both UEFI and BIOS:
1
2
3
4
5
6
7
8
9
10
11
12
13
Add-DhcpServerv4Policy -Name "PXEClient (UEFI x64)" -ScopeId 10.10.10.0 -Condition OR -VendorClass EQ,"PXEClient (UEFI x64)*"
Add-DhcpServerv4Policy -Name "PXEClient (UEFI x86)" -ScopeId 10.10.10.0 -Condition OR -VendorClass EQ,"PXEClient (UEFI x86)*"
Add-DhcpServerv4Policy -Name "PXEClient (BIOS x86 & x64)" -ScopeId 10.10.10.0 -Condition OR -VendorClass EQ,"PXEClient (BIOS x86 & x64)*"
Add-DhcpServerv4Policy -Name "HTTPClient" -ScopeId 10.10.10.0 -Condition OR -VendorClass EQ,"HTTPClient*"

Set-DhcpServerv4OptionValue -ScopeId 10.10.10.0 -PolicyName "PXEClient (UEFI x64)" -OptionId 066 -Value [Boot-Server-IP]
Set-DhcpServerv4OptionValue -ScopeId 10.10.10.0 -PolicyName "PXEClient (UEFI x64)" -OptionId 067 -Value "ipxe.efi"
Set-DhcpServerv4OptionValue -ScopeId 10.10.10.0 -PolicyName "PXEClient (UEFI x86)" -OptionId 066 -Value [Boot-Server-IP]
Set-DhcpServerv4OptionValue -ScopeId 10.10.10.0 -PolicyName "PXEClient (UEFI x86)" -OptionId 067 -Value "ipxe.efi"
Set-DhcpServerv4OptionValue -ScopeId 10.10.10.0 -PolicyName "PXEClient (BIOS x86 & x64)" -OptionId 066 -Value [Boot-Server-IP]
Set-DhcpServerv4OptionValue -ScopeId 10.10.10.0 -PolicyName "PXEClient (BIOS x86 & x64)" -OptionId 067 -Value "undionly.kpxe"
Set-DhcpServerv4OptionValue -ScopeId 10.10.10.0 -PolicyName "HTTPClient" -OptionId 060 -Value "HTTPClient"
Set-DhcpServerv4OptionValue -ScopeId 10.10.10.0 -PolicyName "HTTPClient" -OptionId 067 -Value "http://[Boot-Server-IP]:4433/ipxe.efi"
DNSMasq DHCP
DNSMasq provides network services including DHCP on Small Networks such as OpenWRT or ASUS Routers, it can also be configured to send different options based on the Vendor Class Identifier.
On an ASUS Router you can SSH into the router and edit the /etc/dnsmasq.conf file to add the following lines replacing 192.168.50.83 with your TFTP/HTTP Server and the boot file with the correct file for your environment:
1
2
3
4
5
6
7
8
9
10
11
12
13
14
15
16
17
18
19
20
21
22
# BIOS
dhcp-match=set:bios,60,PXEClient:Arch:00000
dhcp-boot=tag:bios,netboot.xyz.kpxe,,192.168.50.83
# UEFI x86
dhcp-match=set:efi32,60,PXEClient:Arch:00002
dhcp-boot=tag:efi32,netboot.xyz.efi,,192.168.50.83
# UEFI x86 (Alternate)
dhcp-match=set:efi32-1,60,PXEClient:Arch:00006
dhcp-boot=tag:efi32-1,netboot.xyz.efi,,192.168.50.83
# UEFI x64
dhcp-match=set:efi64,60,PXEClient:Arch:00007
dhcp-boot=tag:efi64,netboot.xyz.efi,,192.168.50.83
# UEFI x64 (Alternate 1)
dhcp-match=set:efi64-1,60,PXEClient:Arch:00008
dhcp-boot=tag:efi64-1,netboot.xyz.efi,,192.168.50.83
# UEFI x64 (Alternate 2)
dhcp-match=set:efi64-2,60,PXEClient:Arch:00009
dhcp-boot=tag:efi64-2,netboot.xyz.efi,,192.168.50.83
# HTTP(s) Booting
dhcp-match=set:http,60,HTTPClient*
dhcp-boot=tag:http,http://192.168.50.83:4433/netboot.xyz.efi
dhcp-option=tag:http,60,HTTPClient
You can just use wildcards to simplify the configuration, the above is just an example.\
- Match format is:
dhcp-match=set:[tag],option,match - Boot format is:
dhcp-boot=[tag],filename,servername,address - Option format is:
dhcp-option=[tag],option,value
Restart the dnsmasq service to apply the changes:
1
2
killall dnsmasq
dnsmasq -log-async -C /etc/dnsmasq.conf
If your using a ASUS Router with stock firmware these changes will be lost on a reboot.
Conclusion
I hope this post has helped you understand the DHCP Options required for PXE & HTTP(s) Booting, next post I’ll probably go into more details of using iPXE & Wimboot for SCCM and maybe auto-whitelisting PXE clients on NAC Enabled Networks via MAB so stay tuned.
If you have any questions or feedback please contact me on Twitter or email in the footer of the left sidebar.
